How to create an OS X Yosemite 10.10 USB installer
Last Updated: June 10, 2015
The problem:
The problem:
Starting from Lion (Mac OS X 10.7), Apple operating systems no longer come with a bundled install DVD, which has been replaced by a hidden recovery partition that can be used for the same purpose. While this has surely meant a remarkable cost slashing for Apple, it has created some inconveniences to users. It's actually pretty easy to reinstall OS X from Recovery Partition but it requires an active Internet connection in order to download the needed files from Apple servers and it's a very slow procedure. This is a consequence of the so-called cloud computing revolution. But, what if we need to reinstall OS X without an active internet connection or we cannot access Wi-Fi from outside the operating system?
Luckily there's an easy fix for this problem: create an emergency boot disk on a bootable USB drive that will work the same way as an install DVD.
What you need:
- A USB flashdrive or external HDD with at least 8 GB of available disk space (the larger, the better).
- The latest installer of OS X Yosemite, downloaded from App Store. (7/5/2015 Update: Apple has just released the update to 10.10.4. 6/10/2015 Update: Apple has released the update to 10.10.3 and has presented the new operating system, OS X 10.11 aka El Capitan).
- Your administrative password.
- Some time and an I.V. of patience/coffee.
The solution:
- Format the USB external flashdrive/HDD: go to Disk Utility (Applications/Utilities or search for it with Spotlight), select the destination drive and click Erase. Make sure to select OS X Journaled as filesystem and name it MyVolume.

- Open Terminal and enter the following command:
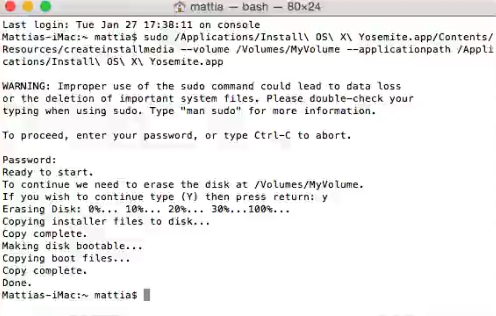
sudo /Applications/Install\ OS\ X\ Yosemite.app/Contents/Resources/createinstallmedia --volume /Volumes/MyVolume --applicationpath /Applications/Install\ OS\ X\ Yosemite.app - Enter your administrative password: When you enter it, it won't be shown but this is the standard for all Unix-based systems (OS X and Linux), so don't panic.

- Grab a coffee/go for a walk: It'll take at least 30 minutes, because the procedure will copy all the operating system files to your itty-bitty pen drive. After the message "Copying installer files to disk", the indicator won't move on for what will look like an endless while and you might think the whole procedure aborted or crashed. Don't worry, I explained you why. Have a walk and check it back later.
- Procedure complete: That's what it looks like when all's done. Now you'll have a USB drive called Install OS X Yosemite, which is your pen drive installer.


- Check it all looks good: Choose Install OS X Yosemite as Startup Disk (System Preferences/Startup Disk) and reboot your Mac. If all looks good, you'll be shown OS X Yosemite installation wizard.


Comments
Post a Comment